Monday, January 30, 2012

Red Wine Stuffed Venison

I consider myself lucky to have a husband who loves to hunt. Not only is it sexy to have a man that provides for his family on several different levels, I enjoy the taste of venison. I became a venison lover the first time my father in law prepared it for me in Upper Michigan many years ago. Only over the past few years have I had my own stock to work with since my husband has reconnected with his passion for hunting. This year he got 2 during bow season, so I've been able to experiment a bit more with preparation. If you don't have any venison on hand, this recipe would work well with pork also.


Ingredients:
3 lb. venison roast
1 cup dried cherries
1/2 cup water
1/2 cup chopped onion
1/2 cup chopped celery
3 Tbs butter
2 cloves minced garlic
2 1/2 cups croutons (you can either get the herbed croutons, or add your own sage/rosemary/thyme)
1 cup chicken broth
1/2 tsp pepper
1/4 tsp ground nutmeg
4 slices of bacon, halved
1 cup red wine
2 Tbs jam

Directions:
1. Preheat the oven to 325 degrees. Bring the cherries and water to a boil and set aside.

2. Saute the onions and celery (and if doing your herbs separately, put them in now too) in the butter until tender. Add the garlic for 1 minute. Add the chicken broth until heated through.

3. To your broth mixture add the croutons, pepper, nutmeg, and cherries with the water. Fold until moistened and set aside.


4. With venison you want to make sure you remove any translucent skin around the outside of the roast. Slice the roast from right to left a half inch thick from the top, to approximately a half an inch from the end without slicing it off. Now do the same from left to right on the bottom of the roast, starting from where you left off, and possibly a third time depending on the thickness of your roast, so that your once thick roast now lays flat. Take a meat tenderizer and with the flat side, pound the meat out to an even thickness.


5. Spread the stuffing onto the meat. Roll the meat up and tie it with kitchen string. Place the slices of bacon across the top. Bake at 325 for 1 hour and 15 minutes.


6. Place 1 cup of wine into a saucepan and add 2 Tbs of jam on medium heat, stirring until the jam dissolves. I chose blackberry jam and a sweet tempranillo to compliment the cherries. But you could use a white and apricot just as easily. With a half hour left, baste the roast with the sauce.

7. Let the meat rest for 15 minutes after removing from the oven before slicing.


The stuffing and venison were good. But the bacon was awesome! Because it covered so much of the roast, it ended up getting most of the wine sauce. Venison can easily dry out due to its leanness, and I like to use bacon to give it some fat to cook with. Because the bacon got the lion's share of the wine sauce, I will try to find a different method next time so the venison gets a chance to absorb some of the wine too. I'm going to find another use for wine basted bacon in the near future though!


Thursday, January 26, 2012

Brown Sugar Custard with Orange Zest

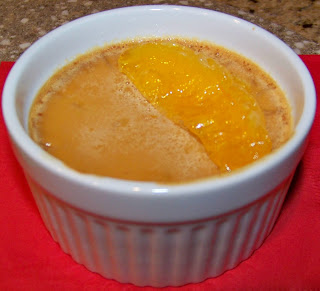
The boys decided they wanted an orange for breakfast yesterday. I thought, right on, I get to try out my microplane! Yeah, I know, I was supposed to be more excited they wanted to eat healthy for breakfast. So I zest the orange peel with no clue yet what to do with it, and give them each half of the orange. As usual, the oldest ate the fruit, the youngest bit into one slice and decided the texture was not for him. So now I had almost half an orange to work with as well. Some sleuthing on the iphone brought me to a custard that included orange zest on Food and Wine's website. Sounded delicious. Almost any dessert sounds like ambrosia to me though. I have tried fried oreos once in Las Vegas, and I thought they were actually pretty good, so maybe I'm not a great culinary judge. After dropping the kiddos off at school, I began making this simple custard, with a slight orange flavor to give it a grown up kick. The only changes I made to the recipe were to use whole evaporated milk as it was on hand, skip the straining step, and add candied orange slices for garnish instead of orange peels.


Brown Sugar Custard with Orange Zest

Ingredients:

1 3/4 cups 2 percent evaporated milk (basically one large can, and half of a 5 oz. can)
3/4 cup dark brown sugar
2 large eggs
1 large egg yolk
1 teaspoon pure vanilla extract
1/2 teaspoon grated orange zest
Candied orange zest, for garnish (optional)


Directions:
  1. Preheat the oven to 325°. Place four 4-ounce ramekins in a small baking dish or roasting pan.
  2. In a saucepan, bring the evaporated milk to a simmer with the brown sugar. Cook over moderate heat, stirring until the sugar dissolves. In a bowl, whisk the eggs, egg yolk, vanilla and orange zest. Slowly whisk the hot milk into the egg mixture. Strain the custard into a glass measuring cup.
  3. Pour the custard into the ramekins. Add enough hot water to the baking dish to reach halfway up the sides of the ramekins. Bake for about 1 hour and 10 minutes, until the custards are just set. Transfer the ramekins to a rack and let cool. Cover the custards with plastic wrap and refrigerate until firm, at least 3 hours. Garnish with the candied orange zest.

Candied Orange Slices

Ingredients:

1 1/2 cups water
1/2 cup granulated sugar
1 navel orange, sectioned

Directions:
In a medium skillet, combine the water and sugar and bring to a boil. Add the orange slices and cook over moderate heat, turning them occasionally, until the liquid is reduced to a thin syrup and the orange slices are translucent, about 20 minutes. Reduce the heat to moderately low and simmer until the syrup is thick and the slices are tender but still intact, turning occasionally, about 10 minutes. Transfer the orange slices to a rack to cool. Reserve the syrup for another use.
*The candied orange slices can be refrigerated for up to 2 weeks.


Of course I reserved that orange flavored simple syrup! It sits in the fridge, awaiting the weekend and a fresh margarita. And the custards were excellent. Much like Mexican Flan I've had in restaurants. A great dessert to impress guests with little effort, and the ability to make ahead so as not to be a headless chicken when your guests are afoot. Interestingly, I had purchased the first suggested wine to be paired with the custard this past weekend, never having heard of it before then. But wine doesn't last long in my home, so I can't say for sure how well I thought they went together, although I suspect quite well.


Wednesday, January 25, 2012

Southwestern Quinoa Salad

I used to think, "Whole grains = yuck!" Give me white bread over wheat anytime. Then I grew up and realized not all whole grains are created equal. While I still don't like whole wheat in most of its incarnations, I have found other healthy whole grains I do like. Quinoa is one of those, although technically a seed and not a grain, it is generally classified in the whole grain category. It is pronounced 'Keen-Wa'. The pronunciation may be tricky, as well as the clean up if the pot boils over- use a larger than you think you need pot if you have cooking ADD like I do! But the preparation of it does not require any more skill than cooking rice. A step some people will take is to rinse their quinoa before cooking it to remove a bitter taste. I personally skip that step, but I skip many steps that save me time and don't seem to add serious value. And while on the slightly expensive side, it can be found in most grocery stores and all health food stores.


I find quinoa to be very mild, almost flavorless. Why then should you use it? Its considered a superfood. It is highest in protein of all the whole grains, it contains magnesium, iron and fiber, and it is gluten free and easily digestible. Would the recipe below taste just as good without quinoa? Yes, it would. Would it be as healthy or filling? Absolutely not. I will shush now about the benefits of quinoa and provide you with one of perhaps thousands of ways to use this healthy grain.

Ingredients:

1 cup uncooked quinoa
2 cups water
1 15 ounce can black beans
1/4 cup chopped green pepper
1/4 cup chopped red pepper
1 lime
1 cup thawed frozen corn
2 tbsp olive oil
1 tsp ground red chile powder
1/2 tsp cumin
2 tsp sea salt

Directions:
Bring 2 cups of water and one cup quinoa to a boil. Reduce heat to low and simmer for 20-25 minutes. When the water is gone and the quinoa is "fluffy", it's done. Remove from the heat. Drain the black beans and put them into the quinoa, along with your corn, and peppers. Squeeze the lime juice in. Add your olive oil. Finally, add your spices and seasonings and give it a good mix. This is one I like to eat hot for lunch, and can easily revisit cold for breakfast.


Side note: I usually make a double batch of quinoa and keep half in a container in the refrigerator. For breakfast today I took a scoop of Quinoa, sliced in some fresh strawberries, drizzled some olive oil and peach balsamic vinegar on top, and shook in some feta cheese. There are so many variations you can have fun testing!


Monday, January 23, 2012

My first blog

Ah, my first blog! Testing...one, two, three. How original. Much like my cooking so far, very inside the box. In fact, much of my cooking came from inside a box until the last five or so years when I have finally started to venture out. A combination of many influences and a love of good food have pushed my creative side to throw my towel into the cooking arena. And now, a chance to blog alongside other food bloggers, learn from them, be part of a community, become more adventurous in my cooking endevors, and learn new techniques, has presented itself through following a friend's blog that was involved with TWD. It helps that I have the cookbook on order and haven't seen a single recipe and the amount of time they will take to achieve. Until that book comes, and my mini meltdown most likely with it, I will focus my inner ninja on the task at hand- getting excited about good food and BAKING WITH JULIA!